When you need a prototype quickly, it’s easy to get overwhelmed by choices, especially if you’re looking for an affordable method. Sand casting is often a budget-friendly option, but can it deliver the detail and speed you need for rapid prototyping? And how well does it balance cost with quality? These are common questions, especially when creating an accurate model without breaking the bank. In this article, we’ll dive into sand casting and rapid prototyping to see how well they work together, breaking down the benefits, process, and what you can expect if you’re looking to get fast results without spending a fortune.
What Is Sand Casting Rapid Prototyping?
Sand casting and rapid prototyping have unique roles, but they make for a powerful approach to fabricating affordable prototypes. So, to fully understand sand casting rapid prototyping, let’s break down each term on its own.
Below is an overview of both terms:
Sand Casting
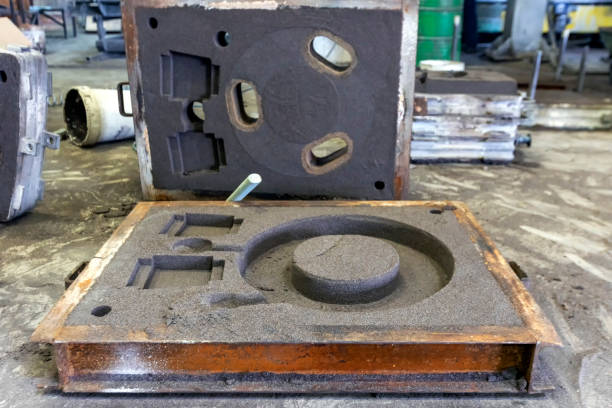
Sand casting is one of the oldest and most reliable ways to shape metal. It involves creating a mold from sand and pouring molten metal into it to form a solid part. The process is relatively straightforward. You start with a pattern of the item you want to create, press it into a sand mold, and then fill it with liquid metal. Once the metal cools and solidifies, you remove the sand mold to reveal the cast part.
The beauty of sand casting lies in its simplicity and low cost. Unlike methods that need high-tech equipment or expensive molds, sand casting relies on easy-to-make sand molds. This makes it ideal for low-volume runs or prototypes with expected quick adjustments. Sand casting is also well known for its versatility. It can be used with various metals like aluminum, iron, and bronze and works well for creating complex shapes and designs.
Rapid Prototyping
Rapid prototyping involves quickly creating a small number of a design’s physical models. It’s a vital step in product development, enabling designers and engineers to develop, test, and refine ideas without committing to full-scale production. Rapid prototyping includes techniques like 3D printing, CNC machining, and, of course, sand casting. Each method offers a fast, affordable way to bring a design to life.
The main advantage of rapid prototyping is that it keeps things flexible. You can make changes on the fly, test different designs, and fix issues early without major expense. In addition, it drastically shortens development time, letting you go from design to model in days instead of months. Simply put, rapid prototyping allows you to experiment freely and refine details, whether testing a new product design or simply wanting a hands-on look at your concept before committing to final production.
Now, what is sand casting rapid prototyping?
Sand casting rapid prototyping combines two distinct methods into one efficient process. It uses the well-established sand casting technique to create prototypes quickly and cost-effectively. With this method, manufacturers press the model or pattern of the desired part into a unique sand mixture to make a mold. The molten metal then gets poured into the mold, taking the shape of the pattern and forming a strong, precise prototype once it cools.
One significant advantage here is flexibility. The process enables metal fabricators to test out complex shapes and designs without the high costs of traditional tooling. Further, sand casting allows you to easily adjust by modifying the mold or pattern. This is especially valuable in rapid prototyping, where you may need to make design changes as new insights arise repeatedly. More so, sand casting rapid prototyping is often one of the most cost-effective methods for early-stage product development. Since sand molds are easy to make and don’t require a lot of special equipment, you can produce sand casting parts quickly without breaking the bank. The process is also adaptable but primarily suitable for small prototype runs.
How to Sand Cast Rapid Prototype
Sand casting a rapid prototype is easier than you might think. With a few key steps, you can transform your design into a solid metal part, perfect for testing and refining.
Check the step-by-step process below so you can see how to get started:
Make a Pattern
The first step in sand casting is creating a pattern. This is a model of the part you want to cast and acts as a template for your mold. You can make it from wood, metal, or plastic, and it should match the final shape and size of your desired part. You don’t need expensive equipment for this part. Many people start with basic tools to shape their pattern, even using hand-carved wood or 3D-printed plastic models. Patterns can be as straightforward or as detailed as you need. But keep in mind that whatever details are on your pattern will show up in the cast part, so if there are specific features, be sure to carve them into the pattern.
Prepare the Sand Mold
Once you have your pattern, you can create the sand mold. Sand casting typically uses green sand, which is damp, clay-bonded sand that holds its shape well. First, place the pattern into a frame (called a flask) and pack the sand tightly around it. Press the sand firmly to capture all the details of the pattern. You’ll need two halves of the mold to make the full cast, so repeat this process with each half.
Once the sand is packed around your pattern, carefully separate the two halves of the mold and remove the pattern. What’s left is a hollow space in the exact shape of your prototype, ready to be filled with metal. If the pattern removal seems tricky, don’t worry; a few taps around the edges should loosen it up without disturbing the mold.
Add a Gating System
A gating system comprises channels that guide the molten metal into the mold cavity, allowing trapped air to escape. This system ensures the metal flows smoothly and evenly, filling every detail without causing air pockets or weak points. Creating a gating system can be as simple as carving channels in the sand, leading from an opening at the top (called a sprue) to the hollow cavity below. Above all, ensure these channels are wide enough to let the metal flow but not so big that they interfere with the casting shape.
Pour the Molten Metal
Here, you must choose a metal suited to sand casting, like aluminum, brass, or bronze, which have relatively low melting points and are easier to work with. Heat the metal using a furnace or kiln until it reaches a liquid state. Be sure to wear protective gear, as this step involves very high temperatures and can be dangerous. Afterward, slowly pour the metal into the gating system, filling the mold evenly. Pour steadily to avoid creating bubbles or voids in the cast.
Cool and Break the Mold
Once the metal has filled the mold, let it cool and harden. The cooling process is essential and can take several minutes to several hours, depending on the type of metal and the size of your casting. It’s tempting to rush, but letting the metal cool thoroughly is vital to a strong prototype. After cooling, carefully break apart the sand mold to reveal the cast part inside. Since sand molds are single-use, they’ll crumble easily, leaving you with your newly formed prototype.
Finish and Test Your Prototype
With the casting complete, you can now add some finishing touches. You can use files, grinders, or sandpaper to smoothen rough edges and refine the surface. This finishing touch can help you get a more accurate feel for the final design. Once your prototype looks ready, you can test it. Check for fit and function, and see how the cast holds up to the intended purpose. If you spot any issues, you can quickly return to the pattern, make adjustments, and repeat the process until your design is correct.
Conclusion
Sand casting is an affordable solution for rapid prototyping. It allows you to create durable metal prototypes quickly and test your designs before full production. From building a pattern to finishing the cast, sand casting provides flexibility without high costs. With sand casting, you gain control over your prototype’s shape, durability, and overall feel, letting you refine and improve as needed. So, if you’re looking for an affordable solution to test and perfect your ideas, sand casting for rapid prototyping is an excellent choice.
At Zintilon, we make it easy and affordable to transform your designs into hands-on parts with expert sand casting. With our experienced teams and resources, we’re here to help you every step of the way. Contact us today to get started!
Keep an eye for more news & updates on DiscoverTribune!


